Tuesday 21 April 2020

Sqoop: Export/Import data from RDBMS to Hadoop and viceversa


Overview:


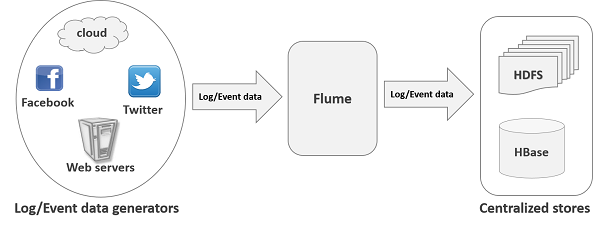
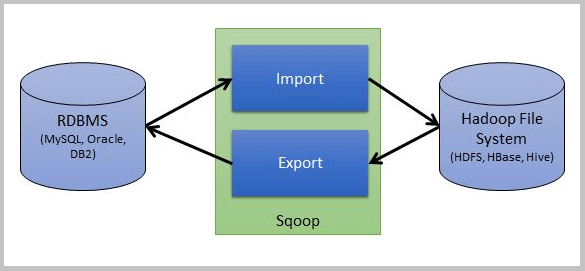
Sqoop is a tool used for data transfer between RDBMS (like MySQL, Oracle SQL etc.) and Hadoop (Hive, HDFS, and HBASE etc.)It is used to import data from RDBMS to Hadoop and export data from Hadoop to RDBMS.
Image result for sqoop architecture

Sqoop Architecture:

Image result for sqoop architecture

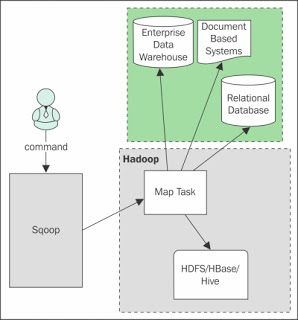
When Sqoop starts functioning, only mapper job will run and reducer is not required. Here only Map phase will run and reduce is not required because the complete import and export process doesn’t require any aggregation and so there is no need of reducers in Sqoop.

SQOOP IMPORT

Sqoop import tool is used to import the tables from a relational database like MySQL, Oracle SQL etc.to the Hadoop system like Sqoop import to HDFS or Hbase etc.

Each row of an RDBMS table is treated as the records of the file. It will store text data in text file and binary data in sequence file or Avro file.

For example, I have one table as below-

The table name is “emp” in the database “userdb” in MySQL database server


Now we will import this table emp data into HDFS. Let’s see how easy it is-

Syntax
-------------
$ sqoop import --connect jdbc:mysql://<mysql-server-hostname>/<database-name>  --username <username-of-mysql-db> --table <table-name>  -n <number-of-mappers> 
-------------

Command

--------
$ sqoop import –connect jdbc:mysql://localhost/userdb –username root –table emp m 1
-----

Once you will run the above commands, you will find it running and using some mappers. Once done, you can also see the output using below commands-
------

$HADOOP_HOME/bin/hadoop fs -cat /emp/part-m-*
------

You will find the output file in HDFS something like below. It will be a comma (,) separated.

101,     John,   5000,   IT,        Developer

102,     Chris,   6000,   Sales,   Manager

103,     Jamie,  7000,   Support, Director

Using the above command, the file will be saved in a default location in HDFS.


Import Table data in a particular location

But what if we want to save the file in a particular location (let’s say rdbmsdata) in HDFS?

You can specify the location (target directory) in above command. For this, we use the below command-

–target-dir /rdbmsdata

So the complete command will be something like below-

$ sqoop import --connect jdbc:mysql://localhost/userdb --username root --table emp --m 1 --target-dir /rdbmsdata

Verify the result using the below command-

-------
$HADOOP_HOME/bin/hadoop fs -cat /rdbmsdata/part-m-*
-------


Incremental Import

This section will be highly helpful to you if you are using on real time data. For example, you are working on some employee data of a company and everyday new hiring is getting done and so new employee will get added as well.

So in such situation, you will only want to import only the newly updated records and in such case incremental import will help you a lot.

To get this done, you need mainly three things-

Incremental-  Mode like appended
check-column – based on which column you want to decide the incremental value
last value – What was the last value you imported so that it will take next value after that

Now considering a new employee has been added in the emp table with the record as below-
------
104,     Henning,         4000,   IT,        Developer
------

And we want to take ID column as the check column and so the last value was 103 and the new is 104.

The complete query to import the newly added rows in the table emp.

Let’s see the query-

------
sqoop import --connect jdbc:mysql://localhost/userdb --username root --table emp 

--m 1 --incremental append --check-column id --last-value 103
------

Again you can check the output using the below command-

$HADOOP_HOME/bin/hadoop fs -cat /emp/part-m-*

As you have seen so far, the result will be comma separated by default while importing the data from the relational database to Hadoop.

In all the above examples, I have shown you how to import table in HDFS through Sqoop. 

How to Import Table Data in HBase with Sqoop?

Like we imported table in HDFS through Sqoop, in a similar way we can do for Hbase as well but there is some twist.

Sqoop doesn’t now permit you to import a relational table directly into an HBase table having multiple column families. To work around this limitation, you can create the HBase table first and then execute three Sqoop import operations to finish the task.

Let’s start by creating an Hbase table first-

Create ‘tablename’, ‘columnfamily’

For example: create ‘empdetails’, ‘personal data’, ‘professional data’

Once you have created a table in HBase, you are all set to write the command to import the RDBMS table into Hbase through Sqoop. Below is the code-

-----
sqoop import --connect jdbc:mysql://localhost/serviceorderdb --username root -P --table emp --columns “designation,name” --hbase-table empdetails --column-family personal details --hbase-row-key ID -m 1
-------

Once executed, you can scan the HBase table to check the output.
------
Scan empdetails;
-----

In the next post I'll write the procedure to export data from Hadoop to RDBMS.


Monday 20 April 2020

Flume Demo: Sink as HDFS

Objective:

In this blog post, I will explain how to run a flume agent with sink as HDFS.

Step 1: 

Create a  agent conf file "example-hdfs.conf" as below with agent name as "a1" and sink as "/user/manoj/flume/". Make sure the directory "/user/manoj/flume/" is available in HDFS. The channel is memory.

The conf file "example-hdfs.conf" looks as below. The channel type and HDFS location is highlighted below:

-------
# example.conf: A single-node Flume configuration

# Name the components on this agent
a1.sources = r1
a1.sinks = k1
a1.channels = c1

# Describe/configure the source
a1.sources.r1.type = netcat
a1.sources.r1.bind = localhost
a1.sources.r1.port = 44444

# Describe the sink
a1.sinks.k1.type = hdfs

# Use a channel which buffers events in memory
a1.channels.c1.type = memory
a1.channels.c1.capacity = 1000
a1.channels.c1.transactionCapacity = 100

#Customizing sink for HDFS

a1.sinks.k1.hdfs.path = /user/manoj/flume
a1.sinks.k1.filePrefix = netcat


# Bind the source and sink to the channel
a1.sources.r1.channels = c1
a1.sinks.k1.channel = c1
---------

STEP 2:

Run the flume agent as below:
-----
flume-ng agent --name a1 --conf /home/manoj/flume/conf --conf-file /home/manoj/flume/conf/example-hdfs.conf
------

Step 3:

Open a telnet connection on port 4444 from another terminal and type something as below:


Step 4:

We could see that this getting written to the HDFS location "/user/manoj/flume". As per the agent configuration file the channel will be memory and sink will be HDFS location.


NOTE:

Inorder to have data stream in plain text format, we need modify the agent conf as below. The highlighted parameter need to be added extra than before.


------------
# example.conf: A single-node Flume configuration

# Name the components on this agent
a1.sources = r1
a1.sinks = k1
a1.channels = c1

# Describe/configure the source
a1.sources.r1.type = netcat
a1.sources.r1.bind = localhost
a1.sources.r1.port = 44444

# Describe the sink
a1.sinks.k1.type = hdfs

# Use a channel which buffers events in memory
a1.channels.c1.type = memory
a1.channels.c1.capacity = 1000
a1.channels.c1.transactionCapacity = 100

#Customizing sink for HDFS

a1.sinks.k1.hdfs.path = /user/manoj/flume
a1.sinks.k1.filePrefix = netcat
a1.sinks.k1.hdfs.fileType = DataStream
a1.sinks.k1.hdfs.rollInterval=120

# Bind the source and sink to the channel
a1.sources.r1.channels = c1
a1.sinks.k1.channel = c1
---------

Please continue to read the followup posts as well :)

Friday 10 April 2020

Flume architecture and its use case

Introduction 

Apache Flume is a tool/service/data ingestion mechanism for collecting aggregating and transporting large amounts of streaming data such as log files, events (etc...) from various sources to a centralized data store.

Flume is a highly reliable, distributed, and configurable tool. It is principally designed to copy streaming data (log data) from various web servers to HDFS..

Apache Flume

Where does flume fit and does not fit?

  • Flume is designed to transport and ingest regularly-generated event data 
  • Need to ingest textual log data into Hadoop/HDFS then Flume is the right fit for your problem, full stop. 
  • If your data is not regularly generated (i.e. you are trying to do a single bulk load of data into a Hadoop cluster) then Flume will still work, but it is probably overkill for your situation.


Apache Flume is a distributed, reliable, and available system for efficiently collecting, aggregating and moving large amounts of log data from many different sources to a centralized data store.

A Flume agent is a (JVM) process that hosts the components through which events flow from an external source to the next destination

Flume Dataflow:

Image result for flume dataflow


Terminologies :
  • Source- consumes events delivered to it by an external source like a web server.
  • Channel- The channel is a passive store that keeps the event until it’s consumed by a Flume sink. 
  • Sink- The sink removes the event from the channel and puts it into an external repository like HDFS
Command:
  • flume-ng  version – To know the version of flume
Creating a Flume agent
  • To define the flow within a single agent, you need to link the sources and sinks via a channel.
  • Need to list the sources, sinks and channels for the given agent, and then point the source and sink to a channel.
  • A source instance can specify multiple channels, but a sink instance can only specify one channel. 
Defining a Flow:

 list the sources, sinks and channels for the agent
<Agent>.sources = <Source>
<Agent>.sinks = <Sink>
<Agent>.channels = <Channel1> <Channel2>

# set channel for source
<Agent>.sources.<Source>.channels = <Channel1> <Channel2> ...

# set channel for sink
<Agent>.sinks.<Sink>.channel = <Channel1>

An agent named agent_foo is reading data from an external avro client and sending it to HDFS via a memory channel.

# list the sources, sinks and channels for the agent
agent_foo.sources = avro-appserver-src-1
agent_foo.sinks = hdfs-sink-1
agent_foo.channels = mem-channel-1

# set channel for source
agent_foo.sources.avro-appserver-src-1.channels = mem-channel-1

# set channel for sink
agent_foo.sinks.hdfs-sink-1.channel = mem-channel-1

Thursday 9 April 2020

Flume demo with source,sink and channel

The basics of flume has already been covered in the previous blog post
http://www.maninmanoj.com/2018/10/flume-architecture-and-its-use-case.html

In this post, I'll explain about the use cases with simple example.

Scenario: 

An example conf file of flume with agent name "a1" this will run a webserver on port "44444" in local machine.

Step 1:

Create a sample file "example.conf" in the directory "/home/manoj/flume". The content of the file will look as below:


-----
# example.conf: A single-node Flume configuration

# Name the components on this agent
a1.sources = r1
a1.sinks = k1
a1.channels = c1

# Describe/configure the source
a1.sources.r1.type = netcat
a1.sources.r1.bind = localhost
a1.sources.r1.port = 44444

# Describe the sink
a1.sinks.k1.type = logger

# Use a channel which buffers events in memory
a1.channels.c1.type = memory
a1.channels.c1.capacity = 1000
a1.channels.c1.transactionCapacity = 100

# Bind the source and sink to the channel
a1.sources.r1.channels = c1
a1.sinks.k1.channel = c1
-------

Step 2:

Now start the webserver on port 44444 and flume agent with the example.conf file and keep it running on one SSH terminal.

-------
 flume-ng agent --name a1 --conf /home/manoj/flume/conf --conf-file /home/manoj/flume/conf/example.conf
------


Step 3:

Open a new SSH connect to the same server and connect to port "44444" as below:


Step 4:

Now if you type anything on telnet connection this will appear at same time on the SSH terminal where flume agent is running.


Output on the flume agent will be as below:


In the next post, I'll explain the flume agent with sink as HDFS.

Monday 22 October 2018

Sqoop: How to Export data from Hadoop (Hive or Hbase) to RDBMS

Overview:

We have an sqoop export tool to export the data back to RDBMS from Hadoop. The only thing you should take care here is, you must have the table created in RDBMS before exporting data from Hadoop to a relational database.

Scenario: I need to migrate a hive table "largedeck" to a RDBMS ( mysql) table "demo" using sqoop.

Step 1:

Download a sample largedeck.txt file to local folder of the hive server.
-------
cd /tmp/testing/
wget https://github.com/dgadiraju/data/raw/master/cards/largedeck.txt.gz
-----

Sample content of largedeck of cards:
------
[root@manoj-testing]# head -10 largedeck.txt
BLACK|SPADE|2
BLACK|SPADE|3
BLACK|SPADE|4
BLACK|SPADE|5
BLACK|SPADE|6
BLACK|SPADE|7
BLACK|SPADE|8
BLACK|SPADE|9
BLACK|SPADE|10
BLACK|SPADE|J
------

Step 2:
-------
Create an external table "largedeck" in hive and Load the data from local folder "/tmp/testing" to
 that external table.
--------

Command to create a hive external table "largedeck" to location "/user/manoj/largedeck":
-----------
create external table largedeck (color string, suit string, pip string)
ROW FORMAT DELIMITED FIELDS TERMINATED BY '|'
LOCATION '/user/manoj/largedeck.txt';
-----------

STEP 3:

LOAD the data to hive table "largedeck"
--------
LOAD DATA  LOCAL INPATH '/tmp/testing/largedeck.txt' INTO TABLE largedeck;
--------


STEP 4: Run the following commands from hive beeline shell to make sure data has been load
-------
>select * from largedeck limit 10;
> select suit, count(1) from largedeck group by suit;
-------

STEP 5:Create a database "demo" in mysql servers and set the user as "demo_user". The password for it is 'changeit'


------
create database demo;
create user 'demo_user' identified by 'changeit';
grant all on demo.* to demo_user;
flush privileges;
------

STEP 6: Now create the following tables in table

----------
mysql -u demo_user -p

create table deck_of_cards (color varchar(10), suit varchar(10), pip varchar(2));
----------

STEP 7:  Run the command from sqoop server to start exporting the hive table "largedeck" to mysql table "demo_user".

--------
 sqoop export --connect "jdbc:mysql://<hostname-of-mysql-server>/demo" --username demo_user --password changeit --table deck_of_cards --export-dir /user/manoj/largedeck.txt --input-fields-terminated-by '|' --num-mappers 2 --outdir java_files
 -------

STEP 8:  Once sqoop export is complete run the below command in mysql shell to see the output

-------
> select count(1) from deck_of_cards;
 -----


Wednesday 1 August 2018

OpenSSL commands


OpenSSL is an open-source implementation of SSL/TLS protocols and is considered to be one of the most versatile SSL tools. 
Open SSL is normally used to generate a Certificate Signing Request (CSR) and private key for different platforms. However, it also has several different functions, which can be listed as follows. It is used to:
  • View details about a CSR or a certificate
  • Compare MD5 hash of a certificate and private key to ensure they match
  • Verify proper installation of the certificate on a website
  • Convert the certificate format
Most of the functions mentioned below can also be performed without involving OpenSSL by using these convenient SSL tools. Here, we have put together few of the most common OpenSSL commands.

General OpenSSL Commands

These are the set of commands that allow the users to generate CSRs, Certificates, Private Keys and many other miscellaneous tasks. Here, we have listed few such commands:
(1) Generate a Certificate Signing Request (CSR) and new private key
openssl req -out CSR.csr -new -newkey rsa:2048 -nodes -keyout privateKey.key

(2) Generate a self-signed certificate
openssl req -x509 -nodes -days 365 -newkey rsa:2048 -keyout privateKey.key -out certificate.crt

(3) Create CSR based on an existing private key
openssl req -out CSR.csr -key privateKey.key –new

(4) Create CSR based on an existing certificate
openssl x509 -x509toreq -in certificate.crt -out CSR.csr -signkey privateKey.key

(5) Passphrase removal from a private key
openssl rsa -in privateKey.pem -out newPrivateKey.pem

SSL Check Commands

These commands are very helpful if the user wants to check the information within an SSL certificate, a Private Key, and CSR. Few online tools can also help you check CSRs and check SSL certificates.
(1) Certificate Signing Request (CSR)
openssl req -text -noout -verify -in CSR.csr

(2) Private Key
openssl rsa -in privateKey.key –check

(3) SSL Certificate
openssl x509 -in certificate.crt -text –noout

(4) PKCS#12 File (.pfx or .p12)
openssl pkcs12 -info -in keyStore.p12

Convert Commands

As per the title, these commands help convert the certificates and keys into different formats to impart them the compatibility with specific servers types. For example, a PEM file, compatible with Apache server, can be converted to PFX (PKCS#12), after which it would be possible for it to work with Tomcat or IIS. 
(1) Convert DER Files (.crt, .cer, .der) to PEM
openssl x509 -inform der -in certificate.cer -out certificate.pem

(2) Convert PEM to DER
openssl x509 -outform der -in certificate.pem -out certificate.der

(3) Convert PKCS #12 File (.pfx, .p12) Containing a Private Key and Certificate to PEM
openssl pkcs12 -in keyStore.pfx -out keyStore.pem –nodes
To output only the private key, users can add –nocerts or –nokeys to output only the certificates.

(4) Convert PEM Certificate (File and a Private Key) to PKCS # 12 (.pfx #12)
openssl pkcs12 -export -out certificate.pfx -inkey privateKey.key -in certificate.crt -certfile CACert.crt

Debugging Using OpenSSL Commands

If there are error messages popping up about your private key not matching the certificate or that the newly-installed certificate is not trusted, you can rely on one of the comments mentioned below. 
(1) Check SSL Connection (All certificates, including Intermediates, are to be displayed)
Here, all the certificates should be displayed, including the Intermediates as well.
openssl s_client -connect www.paypal.com:443

(2) Check MD5 Hash of Public Key
This is to ensure that the public key matches with the CSR or the private key.
openssl x509 -noout -modulus -in certificate.crt | openssl md5
openssl rsa -noout -modulus -in privateKey.key | openssl md5
openssl req -noout -modulus -in CSR.csr | openssl md5

SSL Keytool List

Java Keytool is a key and certificate management utility that allows the users to cache the certificate and manage their own private or public key pairs and certificates. Java Keytool stores all the keys and certificates in a ‘Keystore’, which is, by default, implemented as a file. It contains private keys and certificates that are essential for establishing the reliability of the primary certificate and completing a chain of trust.
Every certificate in Java Keystore has a unique pseudonym/alias. For creating a ‘Java Keystore’, you need to first create the .jks file containing only the private key in the beginning. After that, you need to generate a Certificate Signing Request (CSR) and generate a certificate from it. After this, import the certificate to the Keystore including any root certificates.
The ‘Java Keytool’ basically contains several other functions that help the users export a certificate or to view the certificate details or the list of certificates in Keystore.
Here are few important Java Keytool commands:

For Creating and Importing

These Keytool commands allow users to create a new Java Keytool keysKeystore, generate a Certificate Signing Request (CSR) and import certificates. Before you import the primary certificate for your domain, you need to first import any root or intermediate certificates.
(1) Import a root or intermediate CA certificate to an existing Java keystore
keytool -import -trustcacerts -alias root -file Thawte.crt -keystore keystore.jks

(2) Import a signed primary certificate to an existing Java keystore
keytool -import -trustcacerts -alias mydomain -file mydomain.crt -keystore keystore.jks

(3) Generate a keystore and self-signed certificate
keytool -genkey -keyalg RSA -alias selfsigned -keystore keystore.jks -storepass password -validity 360 -keysize 2048

(4) Generate Key Pair & Java Keystore
keytool -genkey -alias mydomain -keyalg RSA -keystore keystore.jks -keysize 2048

(5) Generate CSR for existing Java Keystore
keytool -certreq -alias mydomain -keystore keystore.jks -file mydomain.csr

For Checking

Users can check the information within a certificate or Java keystore by using the following commands:
(1) Check an individual certificate
keytool -printcert -v -file mydomain.crt

(2) Check certificates in Java keystore
keytool -list -v -keystore keystore.jks

(3) Check specific keystore entry using an alias
keytool -list -v -keystore keystore.jks -alias mydomain

Other Java Keytool Commands

(1) Delete a certificate from Java Keystore keystore
keytool -delete -alias mydomain -keystore keystore.jks

(2) Change the password in Java keystore / Change a Java keystore password
keytool -storepasswd -new new_storepass -keystore keystore.jks

(3) Export certificate from Java keystore
keytool -export -alias mydomain -file mydomain.crt -keystore keystore.jks

(4) List the trusted CA Certificate
keytool -list -v -keystore $JAVA_HOME/jre/lib/security/cacerts

(5) Import new CA into Trusted Certs
keytool -import -trustcacerts -file /path/to/ca/ca.pem -alias CA_ALIAS -keystore $JAVA_HOME/jre/lib/securi

Tuesday 31 July 2018

Hadoop Security: Useful commands for Active Directory usergroup management

In this blog post, I will discuss on some of the common but very useful commands to manage the users in AD.

I've seen that in many Hadoop projects there is a separate AD team for managing Active Directory servers. Many a time a Hadoop admin want to see whether the user has been added in AD or whether a user has been added to a group or whether the password of the user expired etc: The following commands helps in these situations. 

Case1: To check in which all group a user belongs to:

Command:  id <username>

For example: 

[root@manoj ~]$ id hdpadmin

uid=731803102(hdpadmin) gid=731800513(domain_users) groups=731800513(domain_users),731801610(hadoopadmin)

The example states that hdpadmin is a part of "hadoopadmin" group and "domain_users" group.

Case2: Which all users belong to a particular group:

Command:  getent group  <groupname>

For example: 

[root@manoj1 ~]$ getent group hadoopadmin

hadoopadmin:*:731801610:hdpadmin,ambari,

The output shows that in "hadoopadmin" group "hdpadmin" and "ambari" users are present.

Case2: To check whether the password is working for a user:

Command:  ldapsearch -D <username@domainname> -W

For example:

[root@manoj1 ~]$: ldapsearch -D hdpadmin@006eq.clienthub.com -W

Then give the password of hdpadmin user. If you get the output as password accepted then you are fine.